Creating a simple Automation: Hello World
This tutorial shows you how to create a simple Automation that prints Hello World in Bash and Python, using references from input parameters and references from previous Steps.
Prerequisites
- A Blink account. Sign up here.
Overview
This section shows you how to:
- Create a new Pack.
- Create a new Automation.
- Create a Step to print Hello World
- Update a Step to print Hello World using input parameters.
- Create a Step to print Hello World using Python, input and reference parameters.
Creating a new Pack
A Pack is a collection of Automations. If you already have a Pack you can open it and skip ahead to creating a new Automation.
If you don't have an existing pack, follow these steps:
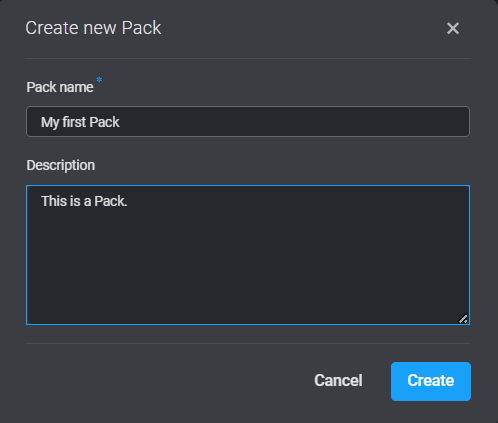
- On your Automation screen, click Create new Pack.
- Enter
Pack name: My first Pack
Description: This is a Pack. - Click Create. The new Pack is displayed on your Automations screen.
Creating a new Automation
- Click Create Automation.
- Enter the parameters:
- Automation Name: Hello World
- Automation description: This is Hello World
- Tags: Demo, Hello World
- Select a type of trigger: Manual
- Click Create Automation. You will be redirected to the Edit page of the Automation.
Automation Step: printing hello world
- Click to open the Action panel. Alternatively, you can drag Actions to your flow, from the menu on the left side of your Edit screen.
- Search and select the Bash Action.
- Enter the following parameters in your Step.
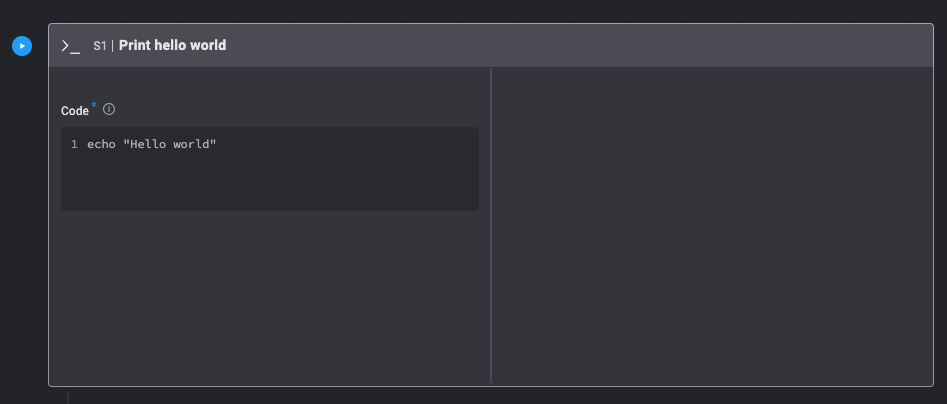
- Click on Action #1 to change the name of the action to Print Hello World
- Code: echo
"Hello World"
- Test the Step by clicking Test run. In the Output field you will see
Hello World.COMPLETED appears on the right side of the Step, indicating the Step has succeeded. - Click Save draft.
Automation Step: printing hello world using input parameters
The same Automation Step can be created using input parameters.
Setting input parameters
On the Edit scree, click Input Parameters.
Enter the parameters:
Parameter Description Parameter Name Name Parameter Type Text Required Parameter Check the box Display Name Name Placeholder Name for greeting Default Value Jon 
Click Apply. The parameters are displayed under Input Parameters.
Updating the Step
- Click to open the Action panel. Alternatively, you can drag Actions to your flow, from the menu on the left side of your Edit screen.
- Search and select the Bash Action.
- Enter the following parameters in your Step.
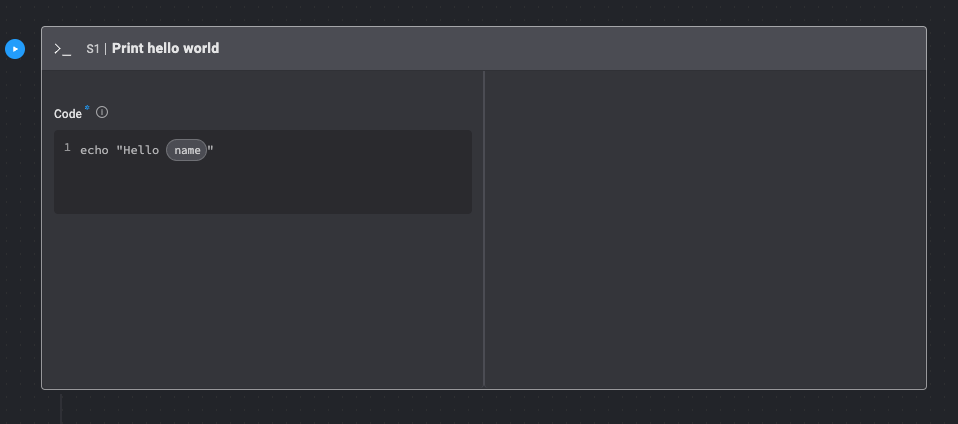
- Click on Action #1 to change the name of the action to Print hello world.
- Code: echo
{{inputs.user_name}}
- Test the Step by clicking Test run.
- Enter the input parameter Name: Jon. In the Output field you will see
hello Jon.
COMPLETED appears on the right side of the Step, indicating the Step has succeeded. - Click Save draft.
Automation Step: printing hello world using Python and input parameters
The same Automation Step can be created using python. In Python action, you can access the context object dictionary and get values from input parameters, variables and Step outputs.
Click to open the Action panel. Alternatively, you can drag Actions to your flow, from the menu on the left side of your Edit screen.
Search and select the Python Action.
Enter the following parameters in your Step.
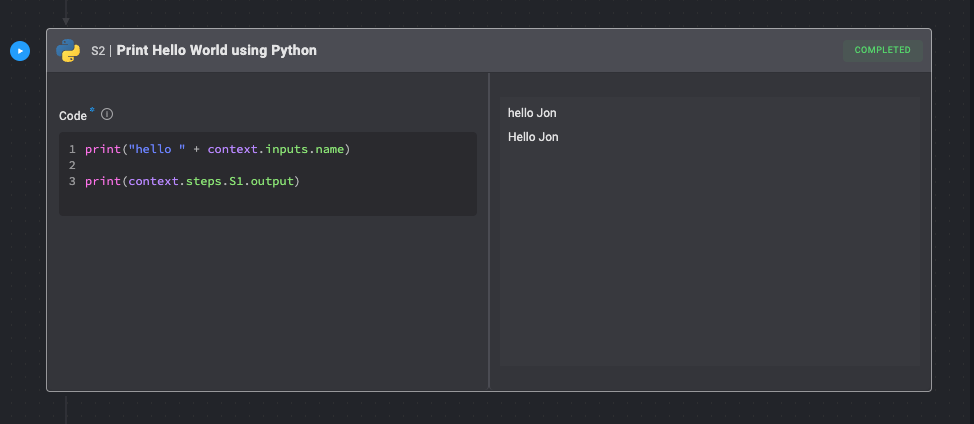
- Click on Action #2 to change the name of the action to Print hello world using Python.
- Code:
print("hello" + context.inputs.name)print(context.steps.s1.output)
Test the Step by clicking Test run.
Enter the input parameter Name: Jon. In the Output field you will see:
hello Jon
Hello Jon
COMPLETED appears on the right side of the Step, indicating the Step has succeeded. The Step took the input parameter and the output from the previous Step to produce the output.
Click Save draft.
Running the Automation
The Automation can be run in several ways:
- Manually in an interactive session: While creating an Automation we start a session and run steps or sections one by one, so we can edit them and rerun them in the same session.
- Manually in a non-interactive session: This is when you run the entire workflow. This can be triggered from the Automation page by clicking on Run All button or from the Automation page.