Triggers
An Automation runs when it is prompted by one of the following triggers:
Event-based: An Automation that is triggered by an event that occurs on an external service provider.
Scheduled: An Automation that is triggered at a pre-set time and can be repeated at any frequency.
On-Demand: An Automation that is triggered when a user requests it from the Self-service portal.

Creating an Automation based on an event from an external service provider
An Automation runs when it is triggered by a specified event on an external service provider.

- Select Event-based Automation.
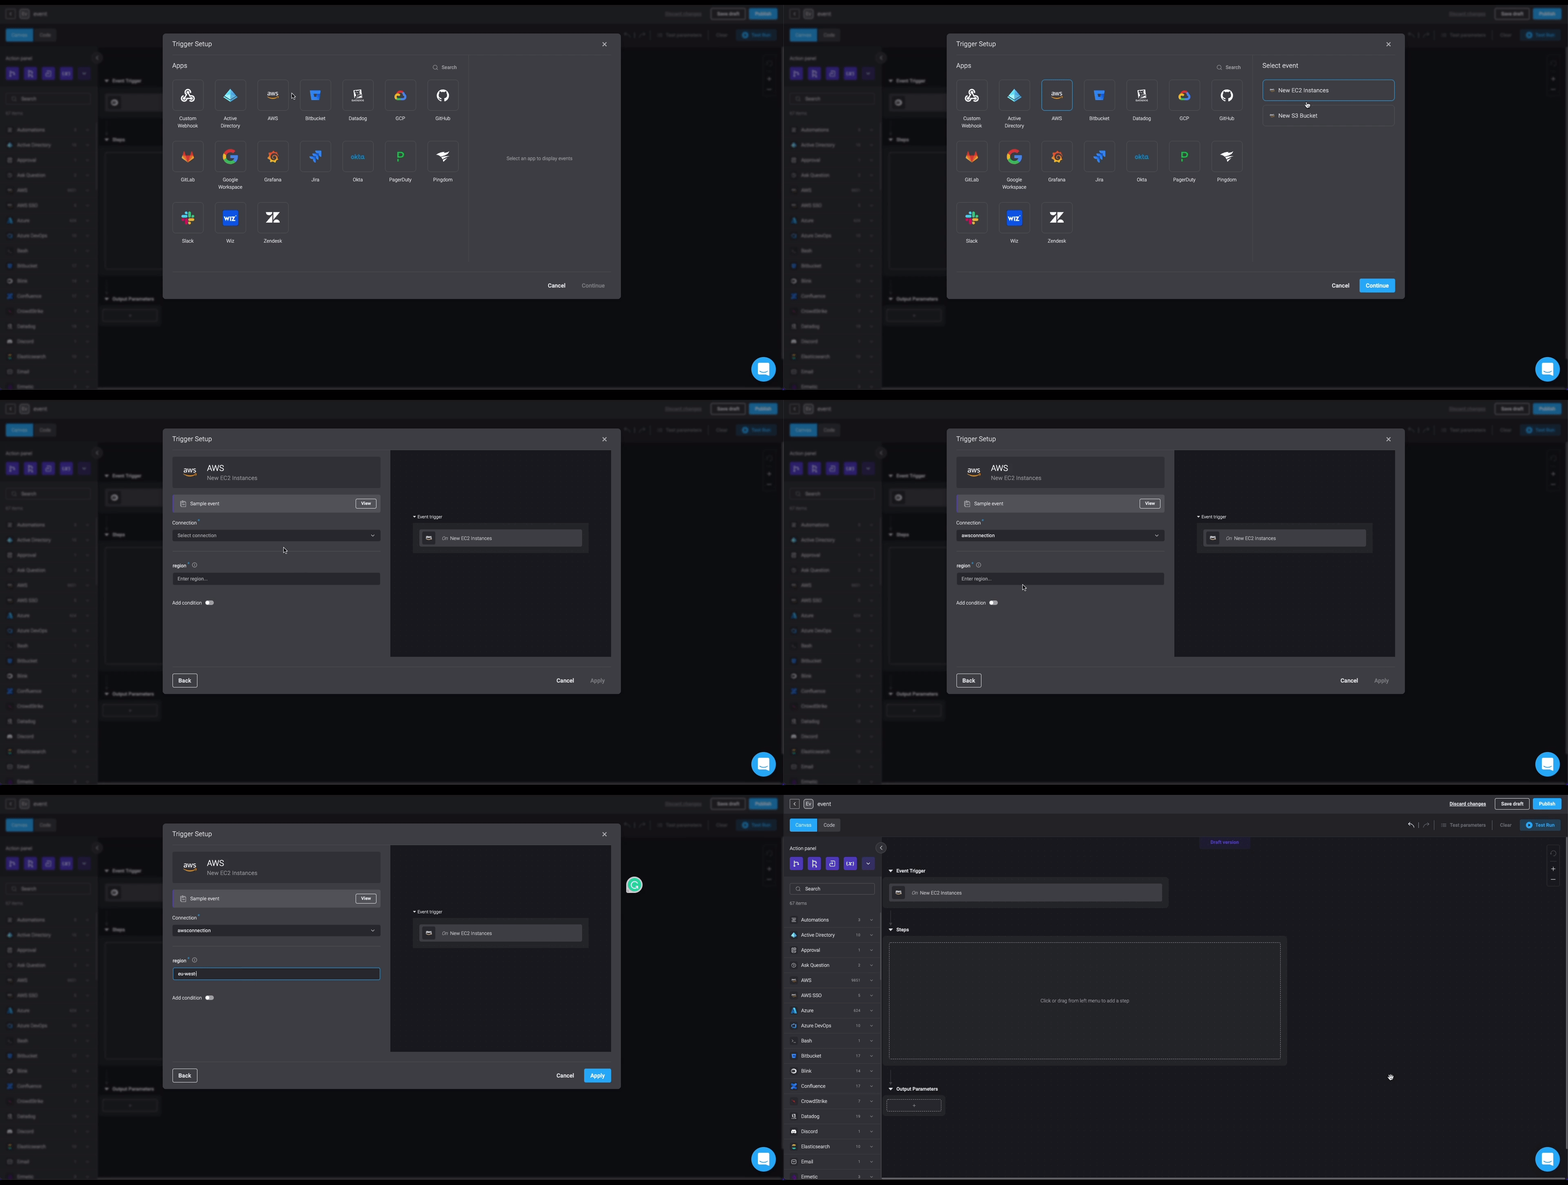
- Select an external service provider, select a supported event > Continue. The Trigger setup dialog box opens.
- In Connections, select an existing connection or Create new connection.
- To trigger the Automation only under certain conditions, enable Add condition . See using the condition builder for more details.
- Click Apply. When this event occurs and the conditions are met, the Automation is triggered.
Creating an event-based Automation using a custom webhook
The Automation runs when it is triggered by an event sent to predetermined URL by the webhook.

- Select Event-based Automation.
- Select Custom webhook > Continue. The Webhook setup is displayed.
- Give the Webhook event a name. The Webhook URL displayed is the URL you need to notify when your custom event occurs.
- The event received from the remote service provider is an unfamiliar JSON object to the system. Use one of the methods below to show the system what to expect:
- Click Configure event schema > Get started. In Sample event click Listen. Send a sample event to the Webhook URL defined in the settings > Apply.
or - Click Configure event schema > Set manually. In Sample event , paste a sample event so the system knows what to expect > Apply.
- To trigger the Automation only under certain conditions, enable Add condition . See using the condition builder for more details.
- Click Apply.
Creating a scheduled Automation
The Automation is scheduled to run at a certain time on a regular basis (hourly,daily, weekly, or monthly), or set custom intervals using Cron expressions, enabling maximum flexibility for the user.

- Select the trigger type of your Automation to be Scheduled. The Edit page of the Automation opens.
- Under Trigger, click Click to schedule a run. The Trigger setup Dialog box opens.
- Click Every time period define when and the frequency at which the Automation will run. Either select a standard value (Hourly, Daily, Weekly, or Monthly), or select Custom to create custom scheduling. Use the Cron expression picker with Cron syntax as follows:
| Symbol | Description |
|---|---|
| * | any value |
| , | value list separator |
| - | range of values |
| / | step values |
The default value is every 5 minutes. Once configured, a preview of your custom schedule is displayed (a human readable string describing the Cron expression).
If an invalid expression is entered, it will be displayed in red font.
- Click Apply. The selected interval is displayed in the Trigger setup.
- Click Apply. The scheduled trigger is displayed under Trigger in the Edit screen of your Automation.
The Cron expression can also be seen in the Automation YAML.
Creating an On-Demand Automation
The Automation runs when its selected in the Self-service portal and the relevant parameters are entered. Not all Automations require input parameters.
- Select Trigger type On-Demand.
- Enter the requested input parameters.
- Click Apply.
Changing the automation trigger type
In the Automation editor, you can change the Automation Trigger type.
- Hover over the Automation Trigger and click on the 3 dot menu > Change trigger type. The Automation Trigger type window is displayed.

- Select which automation trigger you want, and click Apply. The trigger in the canvas has changed to your selected trigger type.
the When you change the Automation Trigger type, the previous Triggers are erased. If you decide to switch back, whatever setting you had for previous Triggers, will not be saved. However, you can revert changes using the Undo button in the editor.